DigitalChalk has joined forces with another email provider to give you even more branding capabilities than ever before!
It’s a simple process that doesn’t require a developer to set up, but you can certainly use it for more technical uses if you would like to do so.
First things first, you need to create an account with Mailgun. Every Mailgun user will receive up to 10,000 emails for free, but you can upgrade to a different account so you can send out more emails per month.
- After creating an account on Mailgun head over to your DigitalChalk account and log in to connect both accounts:
- Select the ‘Administration’ tab.
- Choose ‘Notifications’ from the left side menu and then select ‘Email providers’ to pick the Mailgun tab.
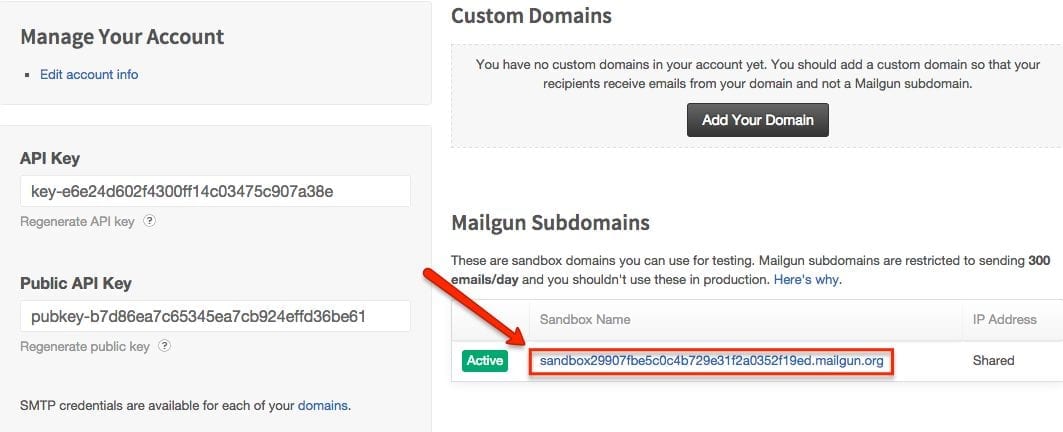
Next, you will need to make sure to have the username and password ready that was given to you by Mailgun and enter it in the username and password fields on DigitalChalk. To gather this information you will want to log in to your Mailgun dashboard. From here you will see a ‘Mailgun Subdomains’ on the right side of the page, and in the section a sandbox name – click on the sandbox link.
On the new page you will see a default SMTP login (you will put this in as the username on the Mailgun setup on DigitalChalk) and the default password (this will go in the password section).
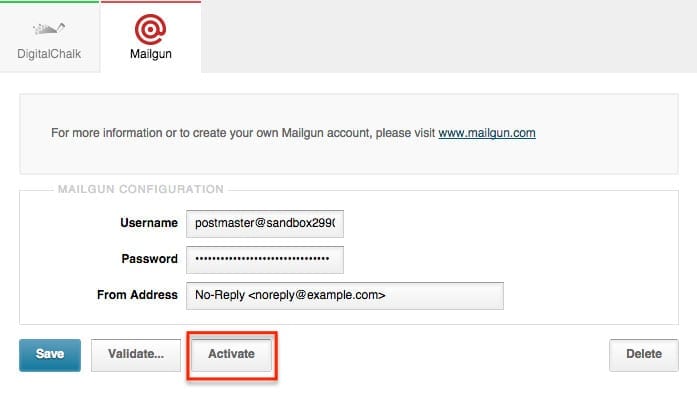
After entering the username and password on DigitalChalk, click ‘Save’.
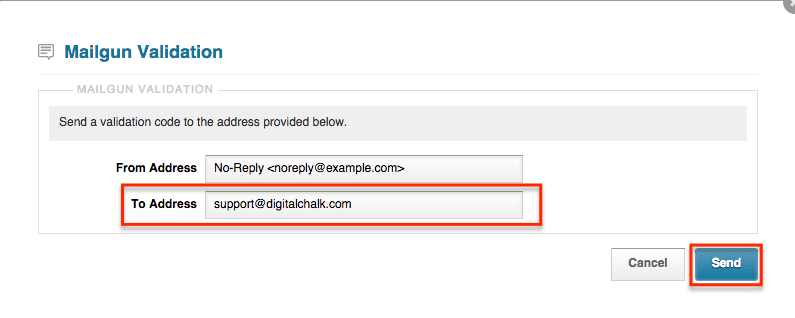
- Next step is to go through the validation process. Click on the ‘Validate’ button and a window will appear, showing a ‘From Address’ and ‘To Address’ – put in an email address in the ‘To Address’ that you would like to receive the validation email.
After hitting the ‘Send’ button, an email will be sent with a validation link. Once you receive the validation email, click the link given – you will be taken to a page letting you know the validation has been successful. You will need to go back to your DigitalChalk organization to continue on in the process.
- After validation you will now see an ‘Activate’ button, click this and a green bar will appear above letting you know the process was successful.
Helpful hint: If you do not see the ‘Activate’ button, you may need to refresh the page.
If you do want to get a little more technical these are a few things you can do with your Mailgun account:
- RESTful API for interacting with Mailgun services (this is 3 times faster than traditional SMTP interface)
- Webhooks are available for mail events (deliveries, mail bounces, spam complaints, unsubscribes, etc.)
- Mailgun’s email validation services are available for free to all Mailgun customers. It is used to validate email addresses submitted through forms (newsletters, online registrations, and shopping carts)
- Analytics (recipient geolocation information, client and device tracking, unsubscribe, and click tracking)
We’re excited about this partnership and we think you’ll be too! Let us know what you think in the comments below!


 After hitting the ‘Send’ button, an email will be sent with a validation link. Once you receive the validation email, click the link given – you will be taken to a page letting you know the validation has been successful. You will need to go back to your DigitalChalk organization to continue on in the process.