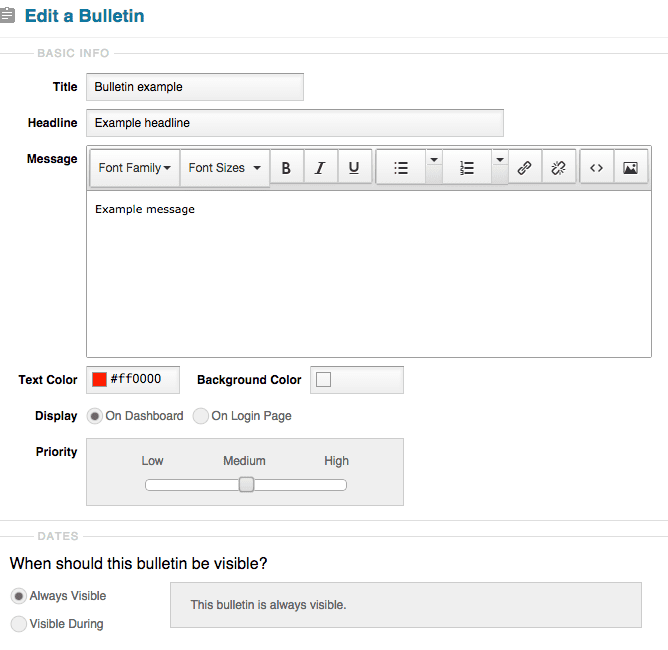
Bulletins can be helpful to inform your users of a number of messages, whether it’s information about a deal on registering or you need to let students know about an update to the course.
They are easy to create and easy to update, or remove whenever need be. With a few easy steps you’ll be ready to go.
How to Create a Bulletin
- You will find the Bulletins feature under the ‘Administration’ tab on the left menu. Simply click the ‘Add’ button and begin creating your bulletins.
- The ‘Title’ is the topic of the bulletin, the ‘Headline’ is the sub-topic, and the ‘Message’ is the information given to the student.
- The next step is to select the color scheme of the bulletin – you can use the default color choices, or you can enter in a specific hex codes.
- After selecting the colors for your bulletin, select whether you want the bulletin to be seen on the login page, or on the student dashboard.
- Next, select the bulletin priority in relation to other bulletins. High priority bulletins will be above all of the other bulletins, medium priority bulletins will be in the middle, and low priority bulletins will be at the bottom of the bulletins on the dashboard or login page.
- Next, decide if you want the bulletin to always be visible to students or set a specific time period for when it is visible.
- Finally, click the ‘Save’ button.
Don’t forget that whenever you need to make changes, or delete the bulletin, you can easily do it. To edit you would just need to click on the title, and to delete you would just need to check the box to the left of the bulletin title and this will bring up an option at the bottom to delete it.


